Saturday, August 30, 2014

Skull lamps and an apology for being gone so long

Holy guacamole Batman!  How fast time flies!  I can't believe my last post was over a year ago.  Ugh!  Well, in my defense, I've been swamped...and ecstatic!  I've finally switched gears from DGA AD to Set Costumer/Costume Designer.  Still haven't gotten into the union, but I've got a total of 8 days out of 30 and 11 months to get the last 22...so wish me luck!
I've worked on some amazing projects too, from WonderGrove Kids (my bread and butter) to Zombie Stoners (Asylum), Sharnknado 2 (Asylum), Sex, Death and Bowline (With the tireless Allie Walker as Director!), Hansel VS Gretel (Asylum...seeing a pattern here?!?) Broken Vows with the incredible team Bonnie, Svea and Pattey, as well as a VW commercial and photo shoot.  Whew!  I'm exhausted just typing this all out!
But...above all, my heart still lies with monsters, costumes, and of course...Halloween...which brings me to today's tutorial...

HANGING SKULL PENDANT LAMPS

So, have you seen this pic floating around the net lately?

Gorgeous, right?  We have artist Alex Garnett to thank for them...but at almost $200 a pop and sold out on Etsy, they are waaayyy out of my reach.
Luckily, it's almost Halloween (yay!) which means...skulls galore!  I was downtown today with my friend Claire and stumbled across some cheapie plastic guys that are going to do the trick for me to help get me through until I make enough money to either buy the real thing, or figure out how to cast these suckers in something other than plastic.  Stay tuned...I do want to try to cast one and then see if I can do a cold porcelain mold on that and see how that turns out...but that's later...for now, we'll just stick to the cheapie process!
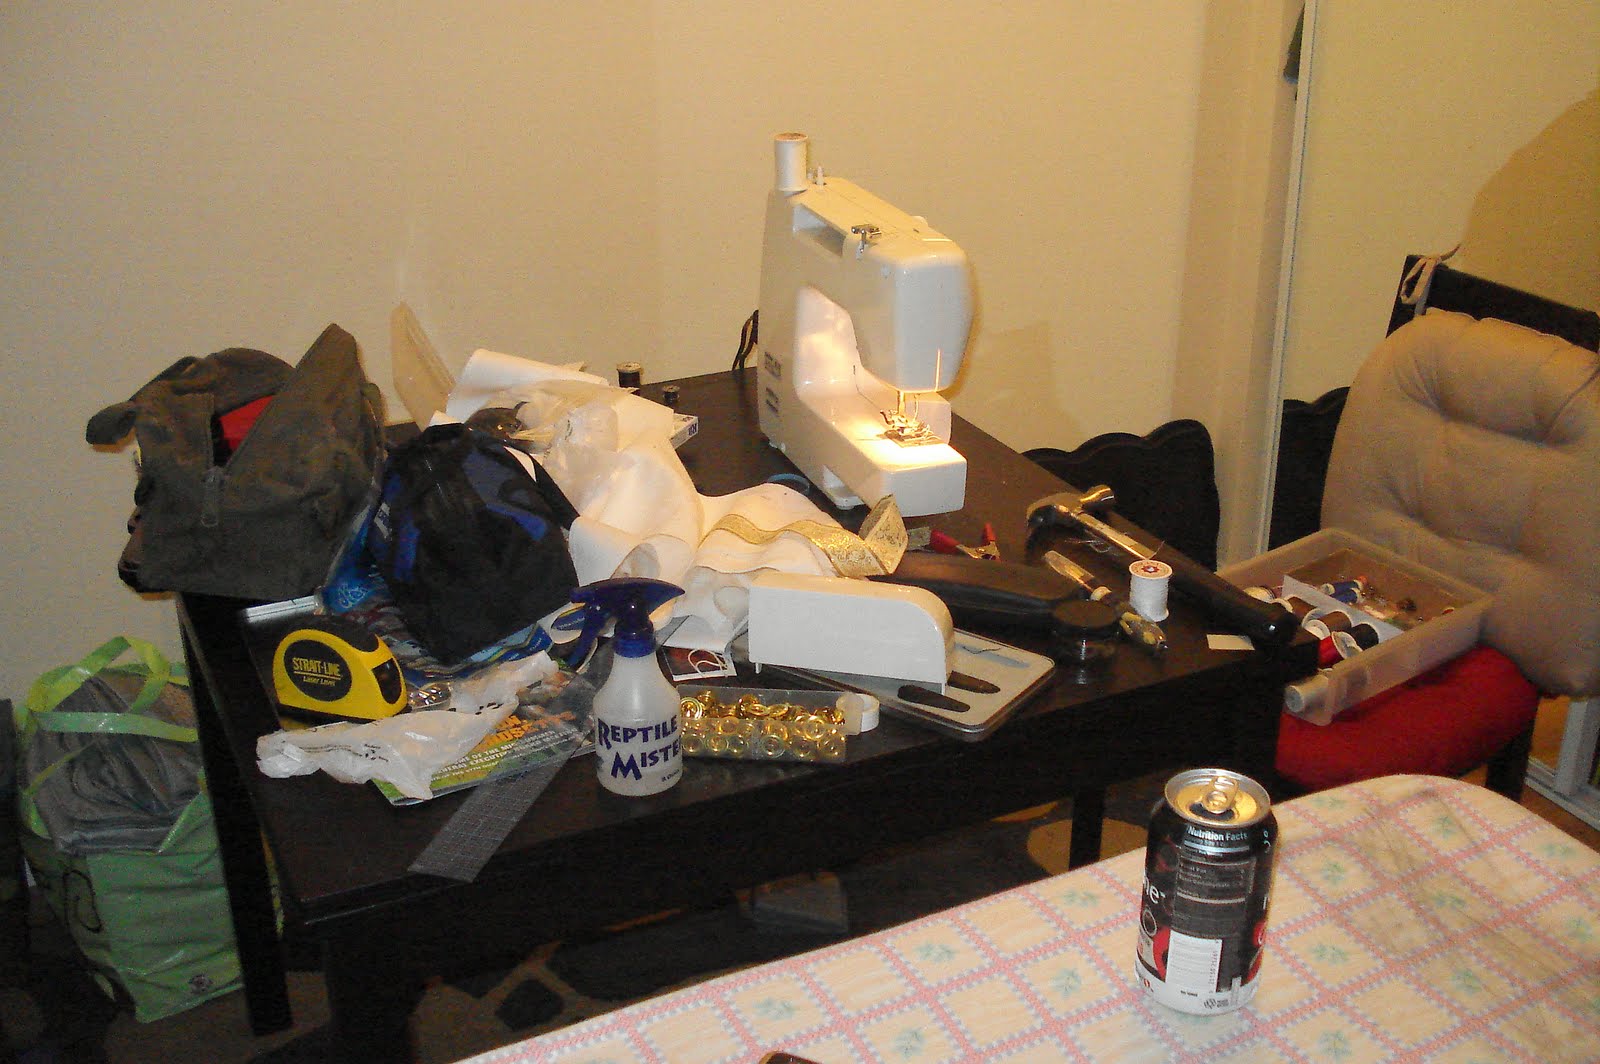
YOU WILL NEED: 

PLASTIC SKULL -- You can pick these up either at any Halloween store, Michael's during the Halloween Fall season, or online through Ebay all year long.  My cost:  $8.98 each (x4) = roughly $40 after taxes.


 LIGHTING KIT:  I got a pre-fab kit from Lowe's called the Candelabra Base Switch Cord.  It came with an 8 foot cord, light socket and rocker switch all pre-assembled.  You can find them here.
This version is really bare bones (ha, no pun intended) and the cheapest option I could find...you can get much fancier with swag kits, etc...but for this attempt, I went cheap.  My cost:  $5.98 (x4) = 23.92

LIGHT BULBS:  We need light!  Make sure if you get the Candelabra base listed above that you make sure you get the right size bulbs...both wattage size and base size.  Candelabra bulbs have a much smaller base than regular bulbs and you don't want to buy the wrong ones and have to go back.  I found a 4 pack of Soft White Energy Efficient bulbs on sale at Lowe's for $13.98.  Score!

PENCIL:  To trace around your light socket.

DRILL WITH 2 BITS:  You'll need a small bit to drill your pilot holes and a second, larger bit to make your socket hole.  I got lucky and had a circular bit in my kit from a door install I did a few years ago, but you can use any drill bit and I'll explain that trick later in step 4.


STEP 1: Okay, now you've got your supplies...let's get started!  The first thing I did was take the jaws off of all my skulls.  It's a personal preference...you can leave them on or remove them...but I liked the look off.  

They were attached with a dot of glue on the inside that just popped off as soon as I unscrewed them.  Super easy!


 Now that the jaw is gone, I no longer have a full skull...just the cranium.  Save the jaws...I don't know what I'm doing with mine yet, but I'll figure something out.


STEP 1A (OPTIONAL):  Luckily for me and this project, the bottom of the skulls was just a gaping hole so I didn't have to do any additional base removal to allow light to shine out...but if your cranium has a "bottom," now is the time to remove it.  You'll want to not only do that to let out light but also heat as this is just a plastic skull and any light bulb is going to get warm (we'll talk about that more later)...
STEP 2:  Trace the socket of your light fixture at the point on your skull where you want to suspend it from.  I chose the center of my skull rather than further back like in the original because of the way the opening on the bottom is positioned.  At this point, it's totally up to you and where you want to put it.
STEP 3:  Drill a tiny pilot hole in the center of your marked circle.  This will help make cutting your hole out much easier in the long run.
STEP 4:  Switch to your larger drill bit.  Like I said above, I got lucky and I had a hole bit from a door install earlier that just happened to be the absolutely perfect size for the skulls.  If you don't have one, you can skip drilling your pilot hole and use your regular drill bit to drill circles along the line of your socket hole.  Drill them close together but not so close as to overlap.  If you've done them close enough, you can either literally punch out the plastic with a little force, or use nippers or a small hand saw (or even an Exacto knife or blade if your skull material is softer...very carefully) to pop out the hole.
STEP 5:  If you've made the hole the right size, the candelabra socket should fit perfectly in it.  Just snap it in place using the side wings to secure it to the sides of your hole.
STEP 6:  Screw in your bulb.  Make sure to check that the bulb is sitting in the center of the skull and not touching any sides.   Traditional bulbs get very hot...and although the new energy efficient bulbs are a bit cooler...they're also pretty toasty as well...and you don't want to melt anything or start any fires.  Ideally I'd like to revisit this project after the holidays and see what I can do about switching out the setup I have now for ultra cool (both in temp and look) LEDs...but that's another day.  For now, we'll stick with this.  I am using 13W CFL bulbs in "soft white."

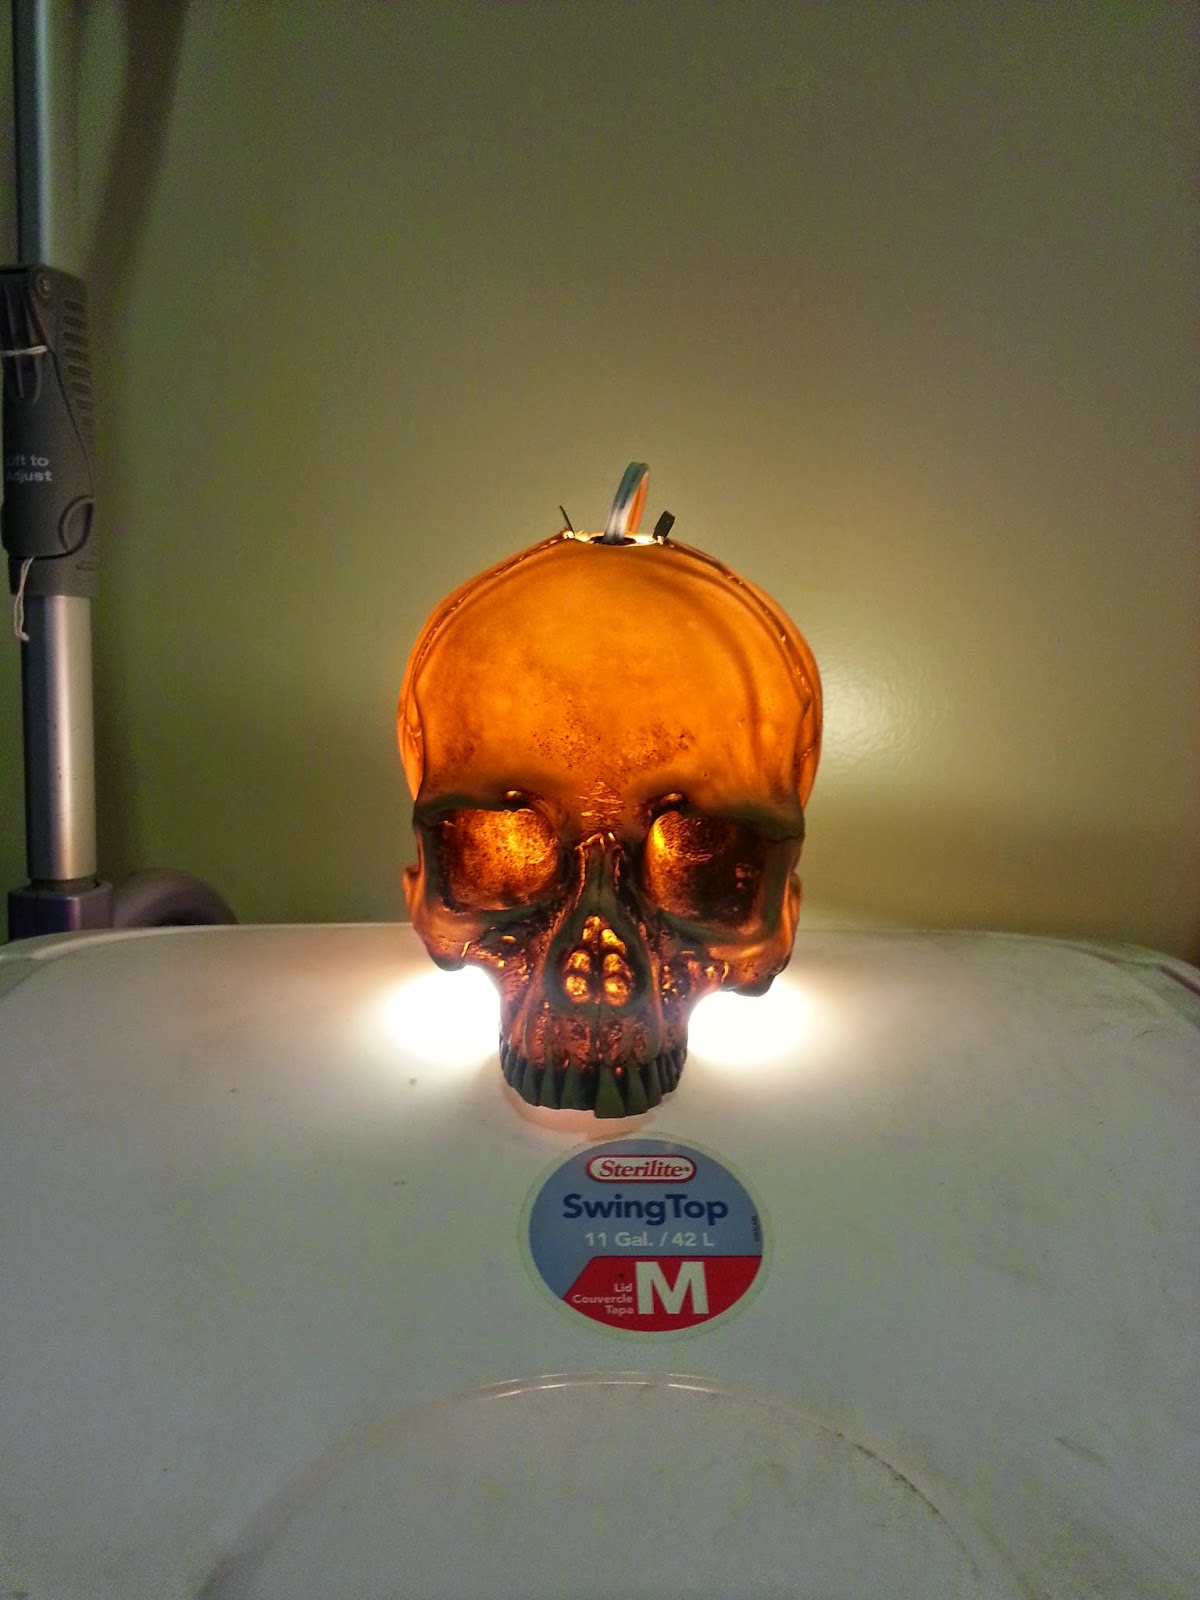
STEP 7:  Flip the switch, step back and enjoy!  That's all there is to it!

FINAL WRAP UP:
I'm using these for a Halloween party I'm throwing this year (stay tuned...MANY more tutorials coming from that) and will be hanging them from the tree in the back yard to illuminate the common area.  Each skull throws out a nice pool of light and spaced out, will be a great addition to the "atmosphere."  I might either paint or wrap the white cords in black material to help hide them at night...the white isn't my idea of perfect, but was the only color available at Lowe's when I went today and I'm too impatient to order black or go to a different store...so for now, they're white...but no matter what...LOVE HOW THIS LOOKS!

TOTAL COST FOR MATERIALS:   Each skull cost me roughly $20.
TOTAL TIME COMMITMENT:  Less than 1 hour from start to finish doing all 4 skulls.  (Honestly, writing this tutorial took more time than assembling the skulls.)


So there you have it.  Skull pendant lamps for a fraction of the cost of the originals.  You can personalize them any way you'd like...maybe some dripping blood?  A new coat of paint?  I might go back and darken the eyes so they really stand out, but for now...I'm happy with the results.


Are you going to make your own?  Send me a photo when you're done!  I'd love to see your versions too!

Take care and happy haunting!

T. Wrex


Saturday, November 5, 2011

Steampunk picks up steam in LA...with a little help!

It was day one of the Comikaze invasion down at the LA Convention Center and we had a blast walking around and looking at all the amazing costumes. Sure, there were your regular Star Wars fans, the obligatory Anime girls, and even Gonzo (yes, THAT Gonzo) made an appearance. Although they were all fun, the real reason I went was to get the low down on the Steampunk movement that is finally gathering (ahem) Steam here in LA!
Steampunk has long had a presence in other cities, predominately Seattle and the East Coast, but it's been a well kept secret here in LA.
One girl is set to help change all that! Dina Kampmeyer, an avid Steampunk fan, has worked tirelessly to help bring Steampunk into the spotlight it deserves! She was a huge driving force in ensuring that Steampunk had their own 101 panel this year at Comikaze and was kind enough to take time out of her very busy schedule to answer a few of my questions!


UH:
When did you first hear about Steampunk and what about it appealed to you?
DINA: I had never heard of Steampunk until I met my boyfriend 2 years ago.
The first picture I ever saw of him was in costume and I was instantly intrigued. As a curvy female, I love the Victorian sillouette and what it does to a woman’s figure. I have also always had a thing for men dressing up in suits and they look even better in Steampunk garb.
There’s something very refined and civilized about the community and the fashion that really draws me to it.


UH: You’ve got some great photos on your Facebook page with some incredibly fun pics at different events…have you always been drawn to creative events like these?
DINA: Well thanks. It’s sort of amazing to me that I had never once
cosplayed (short for "costume play", is a type of performance art in which participants don costumes and accessories to represent a specific character or idea) until a couple of years ago. Halloween has always been my favorite holiday and I always loved to dress up, but I wasn’t really involved with the geek community and didn’t realize that you could dress up any time of the year and have fun. Now that I’m aware, you can hardly stop me from cosplaying. I have created so many outfits already and I have a ton more that I can’t wait to start on. I’ve
always been an unofficial event planner amongst my friends, but I really love having a group to plan things for.


UH: Growing up, I bet you had the best Halloween costumes…what was your favorite? Did you make it yourself? (Labyrinth of Jareth photos are pretty sweet!)

DINA: Hah, I was always a little too into Halloween which didn’t make me super popular in elementary school, but the first costume that I loved when I was a kid was my California Raisin costume. It was so cute and I got to hide in it all day which was the first time I used anonymity
in costuming. I wouldn’t have dreamed of making a costume until a couple of years ago when I taught myself to sew and alter clothes. I’m gonna start work on my first dress pattern soon, so wish me luck!


UH: Tell us what inspires you every day…or even just what makes you get out of bed every day (right now mine’s the PSL at Starbucks…)

DINA: Mmm, coffee. I have my coffee pot on a timer, so when I hear that beep go off in the kitchen, it makes it much easier to get out of bed. I am also listening to all of the Harry Potter books on tape during my commute these days, so that gets me excited in the morning too.

UH: Do you consider yourself “grown up” yet or are you still a big kid?
DINA: I am definitely a grown-up and one of my least expressions on the planet is, “30 is the new 20”. I think it’s important for us all to be responsible adults, but that doesn’t mean that we can’t be silly and enjoy life to the fullest! I still play board games, read young adult novels and dress up for fun. So yah, I’m a grown-up who loves her life and isn’t ashamed to like what I like.

UH: If you could give advice to someone just starting to get into the Steampunk movement, what would it be?
DINA: Excellent question and I was brand-new myself just a couple of years ago, so I can sympathize. I would say to start small, but don’t be afraid to get out there. If you don’t want to spend $200 on a whole outfit, find something in your closet that might work and just go get
some cool stockings or a Victorian hairpiece. I prefer to buy individual pieces instead of whole outfits because 1) It’s cheaper 2) You’ll be able to create more outfits if you can mix and match from your collection. Try and find a local community of Steampunks that you can hang out with and who can give you specific advice. Steampunks love to help out creating costumes, so don’t be afraid to ask. If you can’t find anyone in your area, look online and use etsy.com and
artfire.com to find some fantastic handmade pieces.


UH: What’s your favorite book? Movie?

DINA: That’s a tough one because I love so many different things. If you make me choose though, I’m gonna have to say that my favorite single book is Dune. I first read it in high school for a book report and it completely opened my eyes to science fiction literature and I haven’t
looked back since. My favorite movie is definitely the Lord of the Rings trilogy (yes, I count it as one movie). It’s such a powerful story and it is told with such passion and beauty. I can’t wait for
the Hobbit films!

UH: You’ve really done a lot of work getting Steampunk the recognition it deserves at Comikaze…can you tell us about what you did and how you did it?
DINA: I first heard about Comikaze Expo through my fellow co-founders of the League of Extraordinary Ladies. I emailed Regina Carpinelli who was putting it together to ask if she was interested in having a Steampunk presence at the show. I had been very disappointed at
ComicCon this year that there was only one Steampunk panel the entire time and that it was so crowded I couldn’t get in the door. I met with Regina and she was so excited about including our little community and gave me a lot of freedom to plan several panels and get people
involved. I contacted my friends at the League of S.T.E.A.M. who very kindly agreed to plan some of the panels for me. We’ve got 4 panels planned which is very exciting to me! I’ll be speaking on one panel on Saturday and then moderating my very first panel on Sunday at noon.
I’m very nervous, but I hope we can get a huge turnout and that we’ll be well received.

(On a side note...the Saturday panel was this morning and was a HUGE success!)


UH: It’s a Friday or Saturday night, where would a great place for Steampunk fun be?
DINA: Well, I think that definitely depends on the weekend. There seems to be special events going on all of the time. If you’re ever up for driving down to San Diego, they have a huge Steampunk group down there that does a monthly gathering with live music. In LA, make sure you’re part of the Manticore Society on Facebook because people post events on there all of the time. Also, if you just want to head out to a cool bar, I would recommend the Edison or Villains Tavern. You can definitely dress up at either place and feel right at home.

UH: Anything else you want to add? This is where you just get to blow
off steam (ha ha!), rant and rave or brag or whatever else you’d like!
DINA: Oh gosh, I’m not much of a ranter or a bragger but I suppose I should mention the League of Extraordinary Ladies which I co-founded with a group of amazing geeky gals.We’re trying to unite the geek girl community (although we love geek boys too), which definitely includes Steampunks. We’ve got a huge Facebook group and a website, www.thelxl.com. I actually write the dating column on there, so check it out. Thanks for your time!

You can catch Dina online through her Facebook page and of course through the League of Extraordinary Ladies...
For more information on Steampunk, check out this link (Will take you to Wikipedia).
:)

Tuesday, November 1, 2011

Happy Halloween!

Whew, another Halloween gone and we've all survived! I spent the day before Halloween prepping for all the festivities! I live in an apartment complex (boo) so we never get trick or treaters...but my sister and her husband live in a house up in a great neighborhood so we went there for the fun!
In order to throw a proper trick-or-treat party, you have to make sufficiently nasty (but still yummy) treats!
I made a jello brain mold using raspberry jello and heavy cream which turned out to be both disgusting and rich, but very yummy. I mixed up two boxes of raspberry jello and added in 2 envelopes of Knox unflavored gelatin to help give it some firmness for the mold. Before I added the cream in, I took the raspberry jello and "painted" it into the brain mold folds to look like veins, etc. I then mixed in the cream to the remainder of the jello which gave it a pink fleshy color. All in all, looked pretty good!

After that it was on to the really disgusting stuff. I was flipping through a magazine a few weeks ago and saw a really cool technique where they draped a plastic skull with strips of prosciutto ham to look like a zombie or mummy. It was disgusting and I knew it would be PERFECT! I went to the local pop up Halloween store and picked up a hard plastic skull for about $10. I scrubbed it, disinfected it and ran it through the dishwasher before wrapping it in the strips of meat. SOOOOO GROSS BUT SOOOO PERFECT!
We served it with Wheat Thins, grapes, cantaloupe cubes and asparagus spears. It was very tasty, and yet, not many people ate it... (wonder why???) Tons of compliments though!
The best part was opening my fridge and seeing this monstrosity staring back at me. I felt very serial killerish and spent the entire day praying that there would be no reason for anyone but me to open my fridge...I'm pretty sure if anybody else had, they would have called the cops and I would have spent the day in jail.

I also carved out a tiny sugar pumpkin and stuffed it with onion dip for our chip and dips. Again, looked great but not a lot of munchers. Think I'm doing too good a job on making these look nasty! I call this one "punkin' chunkin'." I took it home and washed it out, filled it with squirrel feed and put it on the back porch. Now my squirrel spends the afternoon eating out of the pumpkin, giving him a decidedly "zombie" styled look. Ha!


Here are just a few fun photos from the night. Enjoy!

Our totally awesome gross and completely yummy tablescape including homemade pumpkin pie, gingerbread haunted houses and graveyard, and of course, the proscuitto skull!


My paper mache skull from a few years ago flickers spooky with the addition of some battery powered fake candles.


Luci waiting in costume for trick-or-treaters. She got a little upset when she realized we were giving the candy away...but after some Skittles, she was okay.


Our cardboard "Graveyard," Grief Gulch.


Mr. Pippers in his costume. Don't worry, he's VERY secure with his masculinity.

Friday, October 28, 2011

Let's get Medieval on that crappy dress!

In keeping with my Medieval theme from earlier this week, I've got a new dress to go along with my Knightly tunic from the last post.

(FYI...this is a project for someone with mid-level and above sewing skills)


First step was to look around and find a suitable dress to use as the starter for my project. I went to the Goodwill (great stuff here, folks!) and found an amazingly hideous brown polyester thingey. (I think it's a dress...but no idea who would ever wear or, or to where!)
Cost at Goodwill? $5.99
I also bought a really pretty cool tablecloth in heavy white with a very subtle fleur de lis pattern in it for $5.99 as well.

My recommendation for this project is to go ahead and buy a dress that is either your size or a size too small. As we're actually adding material to this dress rather than taking it away, we're going to be making the final dress larger than it already is. But don't go running to buy a size 2 if you're an 8 normally...Momma's makin' costumes, here...not miracles!)


Okay, take the dress and you're going to slit it from hem to neck right down the middle in the front. This will allow us to open up the dress and put in the contrasting fabric. Fold back the edges and get a rough approximation of how wide you'd like your center to be.


Take the dress and turn it inside out. Using your fusion tape (God's gift to those of us that either can't sew...or don't want to sew...) you're going to fold under your edges along the line we just cut.


Once that's all tucked under and taped, you'll need to start putting in the center contrasting fabric. Take your contrasting fabric and tuck it under the main dress we're using and figure out how wide you'd like the top of the bodice to be. Know that when you're doing this dress, it will flare out at the bottom, so you can either cut your insert fabric into a modified triangluar shape with it narrow at the top and then flared at the bottom, or as a straight column type shape and then add panels along the bottom for flare. I cut mine so that it was a straight column as it is a much easier shape to start with and great for just getting the project figured out. As you go along and make new dresses or have a higher skill level, you can play around with the shape and sizes you want. For now, we'll keep it simple.


Once you get the contrasting fabric measured, cut it to the size you want. You'll be sewing it into the front of the brown dress to form the stomach panel. Again, use the fusion tape for a quick baste that will help keep the two pieces of fabric in place.


Now to my least favorite part. Yup. Haul out that sewing machine. You're going to want to stitch the brown OVER the white in order for the white panel to be behind the brown in the final project.


Once the stomach panel is all sewn in, you can get a good idea of what your final project is going to look like! My brown dress is shorter than I am so I used extra pieces of the white tablecloth to act as an underskirt and add an extra six inches of length to the final dress all around, but if your dress is the right length to start with, you may have only to do the single panel down the front and be done with the major sewing!


Because I had to add extra length to mine, I had to also trim up the hem at the bottom to make sure it was even. I don't have a ruler long enough to provide for a straight line at the bottom and my cloth tape kept wiggling, so I used my Laser Level I normally use for wood working. I put the dress on the floor, measured where I wanted the length to be, and then used the laser level to give me a straight line. Perfect! Using the laser light as my guide, I got a perfectly straight cut!


Now for the fun part...embellishing!!!

WORDS TO THE WISE...WHEN USING AN IRON ON ANY SYNTHETIC MATERIAL, TEST IT BEFORE YOU START AS SOME FABRICS HAVE A LOWER MELT TEMPERATURE THAN OTHERS!!! You don't want to be half way through your project and end up melting a portion of it because your iron's too hot!

Okay, disclaimer done.


The trim is where you can get truly creative and do whatever you'd like to embellish your gown. I stuck to simple gold and white to help tie the brown of the gown together with the white of the tablecloth. I used gold trim that's available at any craft store (my favorite is Joann's for selection...the one in Porter Ranch CA is like the Costco of craft stores...it's HUGE!) Again, using our handy dandy fusion tape, adhere it to the front of the dress along the sides we've just cut and sewn down to our contrasting fabric.


Once you're done with your trim, we have to add grommets in order to make the front lace closed. Put the dress on and figure out where under your bust you'd like it to lace closed for a nipped in look. Mark that with some pins and then take the dress off. When you add the grommets, you're going to want to go through the front of the fabric. This part is tricky. You are going to want to take the front fabric with your trim and fold the white fabric UNDER it, so when you punch your holes for the grommets, you're punching all the way through the layer of contrasting fabric as well. At the top of the bodice, I stitched in some elastic to help gather the material snugly so that it fit well but still provided enough room for my ta-tas without having it gaping open. When I lace up the grommets, it cinches in my waist and the elastic at the top allows for my boobs.


For the sleeves, I simply repeated the methods we used for the front of the dress by slitting them from wrist to shoulder and then sewing in (or fusion tape...if yours is strong enough!) the contrasting fabric. I wanted to do the deep "bell" shaped sleeves you sometimes see on other dresses but ran out of time for this project. I will add those on later and include the tutorial as well. For now, they look great the way they are.


Now it's time to admire all your hard work! Trim off any extra threads, tack down the last of your trim, turn your dress right side out and try it on! I used a length of brown cord that I had from another project to lace up the front...

And there we are...before and after. From fashion disaster to refined lady!


Just remember to clean up after yourself when you're all done!


HAPPY HALLOWEEN!!!

Tuesday, October 25, 2011

Medieval Times...on a shoestring budget

Happy (almost) Halloween! Today I'm going to show you a quick step by step DIY for a simple tunic that looks a hundred times more expensive than it really is!
First off, let's take a look at what the mass market has for sale:

This costume, which is available online, retails for between $60 and $100 (not including shipping). It looks okay, right? Eh...it's generic and you'll probably run into someone else who's wearing this. So, let's be original!


First step is to gather materials. I went to the Goodwill yesterday in my neighborhood and found some fabulously tacky pillow cases. I don't know if I'd want these on my bed, but for what we're using them for, they're perfect!! Total cost? $3.99.


I did a rough pin onto my dress form to take a good look at the pillow cases before I got started so I could just eyeball what I wanted it to look like when I was done.


I then dug through my scrap box and found some gorgeous yellow silky material with a subtle pattern. I turned it inside out so it wouldn't contrast too much with the red of the pillow cases.
I used a pattern I found online for the roaring lion, using Photoshop to take it and blow it up into a larger size for the chest piece. Using a black Sharpie, I traced the lion onto the gold fabric.


Cutting the gold fabric is tricky and it tends to fray, making tiny details tough. In order to give it some stability I ironed it onto some two sided heat fusion paper. Not only does it make it easier to cut out, but it will help me out later when I attach it to the background fabric.


Now that the lion has been ironed onto the heat fusion paper, it's time to attach it to the darker fabric background. I'm using a medium weight canvas which will not only provide stability to the thinner gold fabric, but will also make it stand out from the red fabric of the pillow cases. I iron on the lion to the black fabric and then cut out the lion, leaving a roughly half inch border all around.


Once that's done I turn back to my trusty fusion paper and iron another sheet onto the back of the now gold and black lion. The fusion paper allows me to skip all the sewing and just iron it directly onto the red pillowcase. I center it in the middle of the pillowcase but keep it in the upper half so that when my knight wears it, it will be easier to see.

The nice thing about the fusion paper is it not only provides stability to my iron on lion but it also keeps the fabric from fraying...but the greatest part is...I don't have to sew the lion on! The fusion paper glues it down for me and I can skip the tedious stitching! Yay!


Now that our lion is on there, let's add a little royal touch (because, let's be honest, our knight is a favorite of the king, so he has to look good!) I use some gold ribbon I have laying around (but if you don't, you can buy it at the fabric store for a few dollars a yard) and pin it along the top of both my pillow cases. Using fusion tape (just like the fusion paper, but thinner) I iron it into place.


Ugh...now the part I'm dreading. Yup...time to haul out the sewing machine. First I put both the pillowcases up on my dress form and make sure the edges on both match up. Using pins, I figure out where I want the neck hole to be as well as the arm holes.


Then it's off to the machine to stitch the shoulder together (remember, don't sew the whole top of the tunic together or you'll sew the neck opening closed and have to spend hours ripping all that out. Ugh) Although I should have used yellow or gold thread, I didn't have any...so I used red, which still looks good.


All the stitching is done, our lion is glued down and we're ready to see the final product! The costume is actually for a friend of mine so unfortunately you're going to have to wait to see it really really really done with the whole costume put all together...but this will give you an idea. I used a rope to act as a temp belt (we'll get a real leather one later) but you can see what the final project looks like.


Okay, let's crunch the final numbers:
2 pillow cases: $3.99
Half yard of gold fabric (1/2 off at JoAnn's for Halloween): $4.25
Half yard of black canvas: $3.00
Fusion Paper and tape: $10.00
Gold Trim, 1.5 yards: $3.99
Spool of red thread: $.99
Total cost?: $26.22
Time commitment: 2 hours

So, there you go, an amazing tunic for less than $30 that will be guaranteed to be better looking than anything you can find in any Halloween shop...

Coming next: How to make a matching dress for your Medieval Lady out of an ugly brown jersey and a white tablecloth.